 Your Mac’s Preview app doesn’t just contain PDF-editing features. It’s a great little image editor, too. Preview offers basic tools for cropping, resizing, rotating, annotating, and otherwise tweaking images.
Just as QuickTime will never replace iMovie in spite of all its useful media editing features, Preview will never replace Photoshop or even iPhoto. But, for some quick and basic image editing, Preview is surprisingly useful.
Get an Image Into Preview
Getting an image into Preview is easy. By default, you can simply double-click an image file and it will open in Preview. If you’ve changed your image file associations, you can Command-click or right-click on an image file, point to Open With, and select Preview.
You can also open the Preview app from the Applications folder, Launchpad, or by pressing Command + Space to open Spotlight Search and searching for Preview. From Preview, you can open the image file directly. Or, with Preview open, you can click File > New From Clipboard to import an image file from your clipboard. You can then edit the image and get it back onto your clipboard by clicking Edit > Copy.
If you’d like to take a screenshot and edit it, you can press Command+Shift+3 to snap a screenshot of your entire screen, Command+Shift+4 to snap a screenshot of a selectable area, or Command+Shift+5 to snap a screenshot of only the current window. The screenshot will be saved as a .png file on your desktop, and you can open it in Preview to begin editing it. (Or, you can hold Ctrl as you take a screenshot — Command+Ctrl+Shift+3, for example. Your Mac will save the screenshot to your clipboard, and you can import it into Preview with the File > New From Clipboard option.)

Rotate an Image
Rotating an image is simple. Simply click the rotate button on the toolbar near the top-right of the window one or more times. You can also click the Edit menu and click one of the Rotate or Flip options.
To save your changes, click File > Save. You can also click File > Duplicate to create a duplicate copy and save the edited image as a new file, keeping the original image before the edits were made.
To undo any changes, click the Edit menu and select Undo. To revert to the original image file before you began editing it, click the File menu, point to Revert To, and select the original image version.
 Rotate an Image
Rotating an image is simple. Simply click the rotate button on the toolbar near the top-right of the window one or more times. You can also click the Edit menu and click one of the Rotate or Flip options.
To save your changes, click File > Save. You can also click File > Duplicate to create a duplicate copy and save the edited image as a new file, keeping the original image before the edits were made.
To undo any changes, click the Edit menu and select Undo. To revert to the original image file before you began editing it, click the File menu, point to Revert To, and select the original image version.
Crop an Image
Cropping an image is also simple. Preview uses the rectangular selection by default, so you should just be able to start clicking and dragging. Click the Tools menu and select Rectangular Selection if this isn’t working as expected.
Click and drag anywhere in the image to select a rectangular section of the image. Click Tools > Crop afterward and preview will crop the selection, cutting out everything else in the image. As with any edit, click File > Save to save your changes.
 Resize an Image
Select Tools > Adjust Size to bring up the Resize dialog, which will allow you to resize the image. It supports many measurement units, including pixels. By default, it will resize the image proportionally, maintaining the original aspect ratio to ensure the resized image doesn’t look stretched or smooshed.
Image-resizing tools like this one are useful for shrinking images so they don’t take up as much visible area or on-disk space. They’re not ideal for enlarging an image as the blown-up image will be lower-quality — for this reason, enlarging an image is almost never a good idea.

Annotate an Image
Preview includes various image mark-up tools — the same ones that work in PDFs — which you can access by clicking the Show Markup Toolbar button near the top-right corner of the window. You can also click the Tools menu, point to Annotate, and select one of these tools in the menu.
Select a tool and it will replace the default “rectangular selection” tool. You can then click somewhere in the image to add text, draw a line, highlight an area, create a shape, or insert an arrow — whichever tool you’ve selected.

Adjust Color or Gamma
The built-in Preview application also has a tool for adjusting the color levels or gamma of an image. Click Tools > Adjust Color to access it. Use the options on the pane that appears to adjust various color settings. The pane includes an overall color level graph you can modify as well as sliders for adjusting exposure, contrast, highlights, shadows, saturation, temperature, tint, sepia, and sharpness. It’s useful for everything from fixing the color levels of an image to applying that old-timey sepia filter Instagram made trendy.
It doesn’t matter if you’re not sure what the options do — the image will update in the background as you adjust these sliders, so you can see a preview of your color adjustments in real time. You can figure out what the options do by playing with them.
Preview is a surprisingly powerful app. Not only can it view just a single image file at a time, it can view multiple images at a time and quickly cycle between them, producing a sort of slideshow. To do this, select multiple images in the Finder by holding the Shift key and clicking each. Next, Command-click or right-click on the images and open them in Preview. Preview will open with a sidebar showing a list of thumbnails for all the images you opened. Cycle between them using the arrow keys or by clicking the thumbnail images to quickly view all of them.

 This is a step-by-step guide that illustrates how you can quickly and easily install a copy of Windows 8 on your MacBook or iMac using the free Boot Camp software.

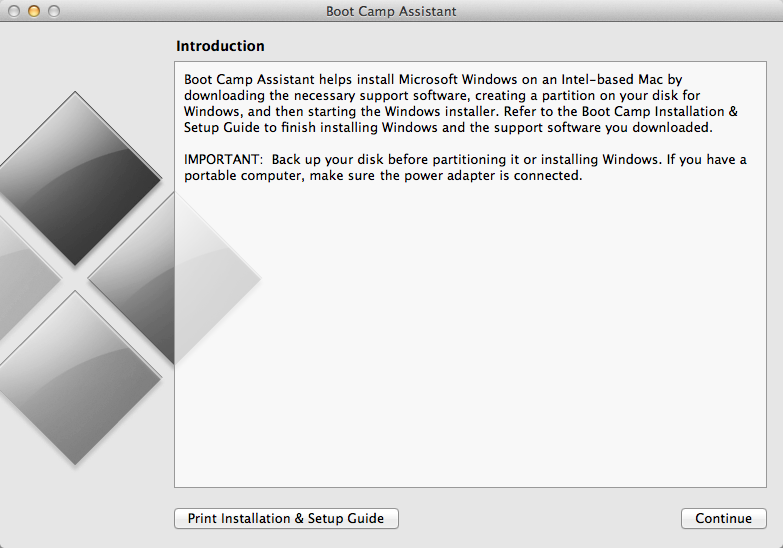 Step 2: Launch the Boot Camp Assistant available under the Applications – > Utilities folder of your Mac.


